Painting Inspiration

National Paint Week: Tutorial Painting British Flag on Fence Boards

I made this British Flag inspired art for my nephew, Kirby. He is 18 and collects flags from around the world, so I thought this would go...

Showing posts with label Chair Obsession. Show all posts

Tuesday, October 13, 2015

Mix and Chic New Dining Room Inspiration via Chairish

Since we have made the decision to downsize to a smaller home, I have realized that I am going to have to let go of my large dining room furnishings. I have a huge china hutch that is over 10 feet long and a dining table that seats up to 12. This is not going to work in the new house, so I've been window shopping over at Chairish.com. Have you discovered this little gem, yet?

Chairish is online shopping heaven, in my opinion. Their tagline is "Where Design Lovers Buy and Sell" if you are downsizing, like me or love design, this is the place to shop and sell. I love this page on Shabby Chic Style.

I will be going with my same mix of modern and Shabby Chic furnishings for our new home. I will need a much smaller dining room table. I have these 3 in mind:

The color and scale of this Lilly Pulitzer dining set makes my heart happy.


I like the idea of this simple farm table with bench seating. I could squeeze more people around this table and the bench wouldn't take up as much space visually. I'd probably paint the legs white.


This classic design with neutral colors is probably more like what we will go with. If the table had a leaf that extended it, this would be the one.


I will also need a replacement hutch. I found this lovely Vintage Ming Style Lacquered Buffet for only $1450. The scale is much better.

But I really am a Shabby Chic, Vintage loving girl at heart, so I think I will go with something more like this rustic gray piece.


Isn't it dreamy? Oh, and you must check out the accessories, the lighting and the rugs! I want these:


Is my design style "all over the place"? Probably. But I love mixing and matching Shabby Chic, rustic, new and modern pieces to create my own unique "Mix and Chic" style.

Downsizing has been a hard decision, but with most of our children grown, it is time to spend less time on our house and more time on vacation, don't you think? I will be excited to fill the new smaller home with lovely smaller furnishings and will be probably be listing my larger furniture pieces to sell on Chairish.com.

Now on to house hunting! Wish me luck. I'll be blogging our journey.


Tuesday, May 21, 2013

Green Cottage: Decorating with painted furniture, antiques & upholstered pieces


Located inside the grounds of Emerson Courtyard, Clara's Cottage or as we currently call it the Green Cottage is located on the top floor. This cottage is full of hand painted furniture. It is a good example of how to coordinate painted furniture with antiques and upholstered pieces.


The cottage is filled with light. It has 2 bedrooms, bath, living and dining area. But is has something more than that. It has the feeling of home.


This hand painted table and chairs is done in a variety of styles. From the checker board pattern to the crackle paint, to the tole painted fruit, it's just plain cute. It's topped with glass to protect the finish. Let's take a closer look, shall we?


The top looks like an adorable table cloth, only better. Notice the little sofa table in the background? Also hand painted in the yellow and green that is the theme of this cottage. It now houses a microwave and kitchen necessities, after all, this is the dining space.


Even the table base is crackled and each chair has that little checkerboard pattern.


Moving on to the rest of the cottage, the living room has 2 painted furniture pieces with it's green coffee table and yellow drop leaf table. (I must confess it was me that put that television on top of it. I am going to wall mount it as soon as possible.) These pieces are paired with a slip covered arm chair and the cutest crazy-bright checkerboard patterned couch.


I love this couch! I would never have purchased it but it is the most cheerful thing. And it's deep and cozy too.


The view out the window in the living room. It's like being in a tree house.


The master bedroom of the cottage houses 3 more hand painted pieces. The headboard is a picket fence with hand painted flowers, there is a rustic antique painted trestle table at the beside and an adorable hand painted shelf in the corner, all paired with an antique armoire. I'm going to do a separate post on the bedrooms, there are too many details to cover. (Read about the bedrooms HERE.)


This is one of the twin beds in the cottage. The linens and details of this room are so welcoming.  I just want to move right in.

Once you walk through the doors here, you are hit with the lovingly decorated details that welcome you. I strive to achieve this welcoming feeling in my home. I think it is what we are all hoping for when we decorate.


Tuesday, May 14, 2013

Yellow Cottage Painted Bed

I know you have been wondering where I've been lately and I have to tell you, I've found my dream job. I am not a 9 to 5 girl, haven't been for years but this job I just couldn't pass up. I am managing this amazing property with 4 vacation homes all built around a central courtyard in the most stunning garden. It's called Emerson Courtyard. I had the pleasure of building their website and setting up their Facebook and Twitter accounts, now I get to manage it.  I have to tell you, I am in heaven!

Come take a tour of one of the vacation homes with me...

Vera's Yellow Cottage


The Yellow Cottage (or Vera's Cottage) is located in the courtyard. It is a studio with queen bed, sofa, arm chair, private courtyard with 2 person hot tub. Kind of a nondescript explanation for this adorable little private get-away cottage.


I'm seriously in love with this painted 4 poster queen size bed. It's a lovely pale yellow. 


The "breakfast-in-bed table" rolls away on the cutest little baby buggy wheels. It is all custom made and hand painted.


The bed posts, finial and scalloped headboard are painted and distressed in just the right places.


It's just dreamy, isn't it?


Here's the rest of the room. Sofa, arm chair, hand painted book shelf. It's just charming.


This room has beautiful hardwood floors, adorable coffee and side tables that look like little picket fences. The sofa is the type that you sink in to and want to curl up with a good book next to the adorable gas "wood" stove.


It lights up with the flick of a switch.  


Dried lavender from the gardens: 1 1/2 acres of manicured, formal English gardens located right here in Kellogg, Idaho.


The view outside the cottage door to the courtyard.  I am smitten with this place. I could move in to this cottage and write that novel I stared writing all those years ago. After all, it has a hot tub, refrigerator, microwave, coffee, wifi and that bed. What else would a girl need?

Would you do me a huge favor? Follow Emerson Courtyard on Twitter and Like on Facebook, it's me doing all that jazz...


Monday, January 2, 2012

My Favorite DIY Project of 2011

Here are a few of my favorite DIY projects from 2011.

        Spoon Curtain Tie Backs                      Distressed Dresser                       Ugly Lamp Gets Paint          

 
             Garden Chandelier Tutorial                                    Voice Sign Tutorial

Of all the DIY Projects I did this year, these chairs are my favorite:

After I spray painted these old chairs black and recovered the seats with drop cloth material, I thought they were pretty boring, so here's what I did:

I stencilled random numbers on the chair backs. Since these chairs are for my daughter's first apartment, she picked the numbers. Kids :)

These paper stencils were purchased at the local True Value Hardware store and the paint is just standard acrylic craft paint.

Such a great change!

Once I got this far, I decided I could not leave the seats all plain and boring.

So I measured my stripe.

Used my trusty painters tape and stencilled with black acrylic craft paint. I recommend adding a Fabric Medium to the paint to make it more durable and pliable. {See my tutorial on using Fabric Medium HERE.}

I used a stencil brush in a swirling motion to paint it on.

Aren't they just fun? My daughter just loves the way they turned out and so do I. I can't wait to begin working on my own dining room transformation. Beginning January 18th, I hope you'll come back to check it out!


Linking up with:


Thursday, October 20, 2011

Stenciled Chairs Get Striped Seat

If you are new to the paint series this is day 20 of 31 days of the Power of Paint. If you'd like to see the entire series click  HERE.


Stenciled Chairs Get Striped Seat
You remember my Random Numbered Stenciled Chairs, right? They were so much fun to do but after the stencils, the seats seemed to be lacking in flair.


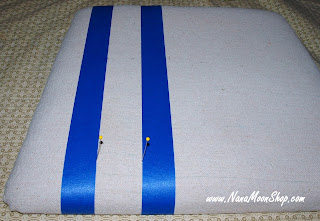
I gathered the necessary supplies: Acrylic paint, painters tape, tape measure, straight pins and stencil brush.


I started with a tape measure to determine where I wanted to place the stripe. I figured the opposite side of the numbers would look best to give a little balance to the chairs.


I took 2 straight pins and poked them in 2 inches apart and used these as a guide for my painters tape.


This drove Joe nuts, he was over my shoulder watching as I did the second one. He expected me to measure the top as well but since the top of the seat is smaller in width than the bottom and I didn't think I needed to do that much math, I just taped it as straight as possible. I worked. I told him, "This is not rocket science, it's art."  


What would I do without painters tape? I think I could do another series just involving the use of painters tape. I used a stencil brush in a swirling motion to make sure the fabric was coated evenly. I painted right over the tape. Fabric does not cover as well as wood, it took quite a bit of paint. I did not use any water.


This is my favorite part, when you remove the tape and get these lovely straight lines. The paint isn't perfect. It isn't solid but like I said before, this is art. Have fun with it!


Aren't they cute? I love them and so does Samantha. She can't wait for her first apartment and I can't wait to decorate it with her. {I'll be blogging it, of course!}


Two down, two to go. Wait until you see the table I got to go with these. It's getting a paint job too, stay tuned.

If you are interested in a more detailed upholstery project, you should check out my friend, Linda's blog at http://www.mycraftyhomelive.blogspot.com/, she is doing a 31 day series on upholstery. It's incredibly informative. Have you seen all the other 31 Days participants {go HERE}, there are over 700 topics to chose from.

10/25/11 Update: Before you try this, see my tutorial on Textile Medium HERE. I highly suggest adding it to your acrylic paint to give it a smoother, more durable finish.


Linking up with:
Miss Mustard Seed's Furniture Friday
My Romantic Home Show & Tell
The DIY Show Off