Painting Inspiration

National Paint Week: Tutorial Painting British Flag on Fence Boards

I made this British Flag inspired art for my nephew, Kirby. He is 18 and collects flags from around the world, so I thought this would go...

Showing posts with label DIY. Show all posts

Friday, May 2, 2014

Creative Space: Building A Craft Room


It all started when I couldn't find a paint brush. My little "craft area" is located in my basement, it is a drafting desk in a 5x5 foot space cluttered with supplies. It is a wreck. I'm talking train wreck. I wont even take a photo of it because it's THAT bad. When I want to paint, I gather all of my supplies and use either my kitchen table, kitchen counter or go outside. To the left of my "craft area" there is this unfinished basement storage area. It's been a storage area for 10 years and you know what? I haven't used a thing that is being stored in that area for about 10 years!

{"Light bulb" Gru voice} Why am I storing junk when I could be using this space?


So one weekend I went a little crazy and cleaned out the storage area. I could not believe the junk I had. Baby toys from my 21 year old for example, sitting in a large storage container. I channeled my inner Peter Walsh (organizing guru) and did the Keep, Toss, Donate thing. It went quick and I am thrilled to have a blank slate to work with.


Here it is with it's prison walls... but I can't do prison walls. That's not creative! {Light bulb} Let's frame and sheet rock it. Come on kids, Joe, we can do it!


Sophie and Kaleb helped remove odd chunks of concrete from the walls to make them smooth. (We added chalk graffiti too.) They also helped with the framing, since Kaleb is in shop class this year Joe put him to work with the chop saw and drill. It went fast.


2 hours of work and the 12 foot wall was framed.


By the next day it was done. It took them about 4 hours total. And cost under $100. All of the studs were the same height so it was just a matter of cutting lots and lots of the same size. I think Kaleb (he's 15) really enjoyed it.


Yesterday we bought insulation. The kids and I will be installing it while Joe is at work this evening. I have all ready scoped out my cabinets and work table, salvaged from other spaces in my house. I am hoping to have the dry wall go up this weekend.

Happy Spring!


Monday, December 30, 2013

Painted Pantry Door 2014 Color of the Year Sherwin-Williams Exclusive Plum

My pantry door is pretty uninteresting. It's tucked back in a corner of my dining room behind my really large china hutch. It's so nondescript, that it goes unnoticed by most. So when Sherwin-Williams asked me if I would like to try a sample of the 2014 Color of the Year Exclusive Plum, I knew exactly what I wanted to do with it. I picked up my quart of Sherwin-Williams ProClassic in semi-gloss – it is a high-performance coating (will withstand toughest wear and tear) made for doors and trim. The sheen is perfect. Not too shiny and easily washable.

This was a 30 Minute Paint Project from start to finish. I wiped down the door to eliminate dust and dirt. And painted directly over the existing white paint. No primer necessary. Sherwin-Williams ProClassic paint has great coverage. One coat and a few touch-ups was all it took to cover the door completely.


Here is the door BEFORE

 and AFTER

I love the crisp clean look of fresh paint. This one is a real stand out. (Please ignore the reflection on the door from the water cooler.) I added a new curtain and am seriously considering frosting the freshly cleaned glass to hide the clutter behind it. I need to purchase a new door knob as the old one has seen better days and lots of coats of paint.  It's funny how one project can lead to 3 others, isn't it? 

Here is a little more information about Sherwin-Williams Color of the Year 2014.


This pantry door project only took 1/4 of the quart of paint so you will be seeing Exclusive Plum used several more times here on the blog in 2014.

Happy New Year!


There are so many ways to follow Sherwin-Williams for paint inspiration.
FACEBOOK - Sherwin-Williams
TWITTER - @SherwinWilliams
PINTEREST - @SherwinWilliams
INSTAGRAM - @SherwinWilliams
YOUTUBE - Sherwin-Williams 
GOOGLE+ - Sherwin-Williams 


Disclaimer: I received a quart of Sherwin-Williams ProClassic paint in Exclusive Plum in exchange for writing this post. All opinions expressed are my own. 

Tuesday, December 17, 2013

Christmas Around The House featuring Chalkboards

My winter decor started with these signs. They are from the ski resort that I worked at. They date back to the 60s era when the ski resort was called Jackass Ski Bowl (Nice name, huh?). It's now called Silver Mountain. I have several of these signs hanging in my garage. I literally had to dig these out of the trash back in the 90s.


I hung them above my mantel. These tiny brass deer came from my Grandma's house and the trees were painted by Samantha at age 3. She is now 21. (I hang on to things.)


Here is the full wall. My chalkboard fire and little basket of birch from the tree that fell in our front yard create the illusion of an actual fireplace. My grandson Cylas added the gingerbread man and is the reason my candles are a little off center. (Keeping it real.)


The antlers were found in the woods by my son and mounted by a friend of the family. My husband was in shock when I put them here. He said he'd never thought he'd see me decorate with anything so manly. I must admit they have taken some getting use to and an Instagram pole to convince me to keep them there. 


This chalkboard has been used as our count-down to Christmas for many years. Sophie loves to change the number of days.


This is my favorite corner of the living room. Yes, another chalkboard. This one is my absolute favorite. I found it at a vintage market for $5.


I made these little Christmas tree jars with bottle brush trees and Epsom salt snow for center pieces at a luncheon I decorated for at Sophie's school. Now they grace this little corner of the room. 


Happy Holidays!


Monday, December 9, 2013

Snow Globe in a Jar & Coping with Frozen Water Pipes


I love the Christmas season. It's the winter I can do without. As we have been struggling to stay warm and safe in -0 temps, we discovered Friday morning that our water pipes were frozen. We are not new to this, it's happened twice before but it never gets easier. The daily hauling of water from our families homes and my family of 4 showering when it is least inconvenient for them is a struggle. One good thing is I have quit doing dishes. If you can't eat it off of paper or plastic, you can't eat it here. So that's a plus, I guess. Cooking has also come to a halt. Yea, me! :) 

This is how I would prefer to contain winter. Here in this jar, with it's evergreens and snow. While I sit on a beach somewhere warm drinking tropical drinks. Whose with me? 


How To Capture Winter In A Jar


I made this little token of winter for my Grandmother-In-Law, Virginia, who is living in a nursing home and isn't able to get out to enjoy (I use that term loosely here) the winter. It started out as a jelly (or salsa?) jar.


I hot glued 2 tiny bottle brush trees to the bottom of the jar then filled the bottom with a layer of Epsom salt. It is the perfect faux snow, sparkly, inexpensive and on-hand.


I hot glued a piece of drop cloth fabric that I cut with pinking sheers about an inch larger than the lid and then glued on a piece of ribbon on top of it. I left the ends of the ribbon open then tied it in a little knot.


She looked cute and sweet here but I thought I should add a little something sparkly so I got out my metal punches and stamped the word JOY onto a round silver blank.


I strung the JOY pendant on to a ball tipped wire and added a little pink glass bead, threaded the wire through the knot in the ribbon and used my needle nose pliers to twist the wire closed.


Grandma Virginia loved it! I bought a big package of these little trees at Michael's when they were 40% off. I am sending some winter in a jar to my parents in Arizona and am seriously considering hand delivering them.

I hope the winter has been kinder to you!


Tuesday, November 12, 2013

Vintage Marquee Letter gets updated with lights and masking tape


How I gave this vintage plastic marquee letter a serious update with masking tape:


I purchased this 2 foot tall letter S at the Funky Junk Antique's Barn Sale last summer. It has rusty spots and an odd assortment of holes. I had planned on painting it but could not figure out what to do with the extra holes, until I found the isle of bright colored Scotch Tape at Staples.


Sophie's favorite color is orange but she's 8 and I think it might change over time. Masking tape is a semi permanent solution. We can remove it if all of the sudden she wants a new color. Over lapping the tape in small sections working our way around the S provided the striped look that we liked and made it easy for me and my 8 year old to do together.


We really liked how it turned out but I thought it needed a bit more sparkle. So I purchased a small strand of 20 white Christmas lights and fed 6 of them through the already existing smaller holes.


The rest of the lights that didn't have a hole were taped down to the back side. I wanted to make sure the lights didn't rest on her wall so I cut a large glue stick down to 4 one inch sections and glued it to the back of the S to act as a bumper.


Since it had no hanger, I added a bit of ribbon to be able to hang it on the wall. I love how the 6 lights turned out but we both especially love how the back lights show right through the plastic and masking tape.


Here is how it looks in the dark. I will definitely be purchasing more of these letters at the antiques fair next year. I think need a big letter D for my office!


Saturday, August 10, 2013

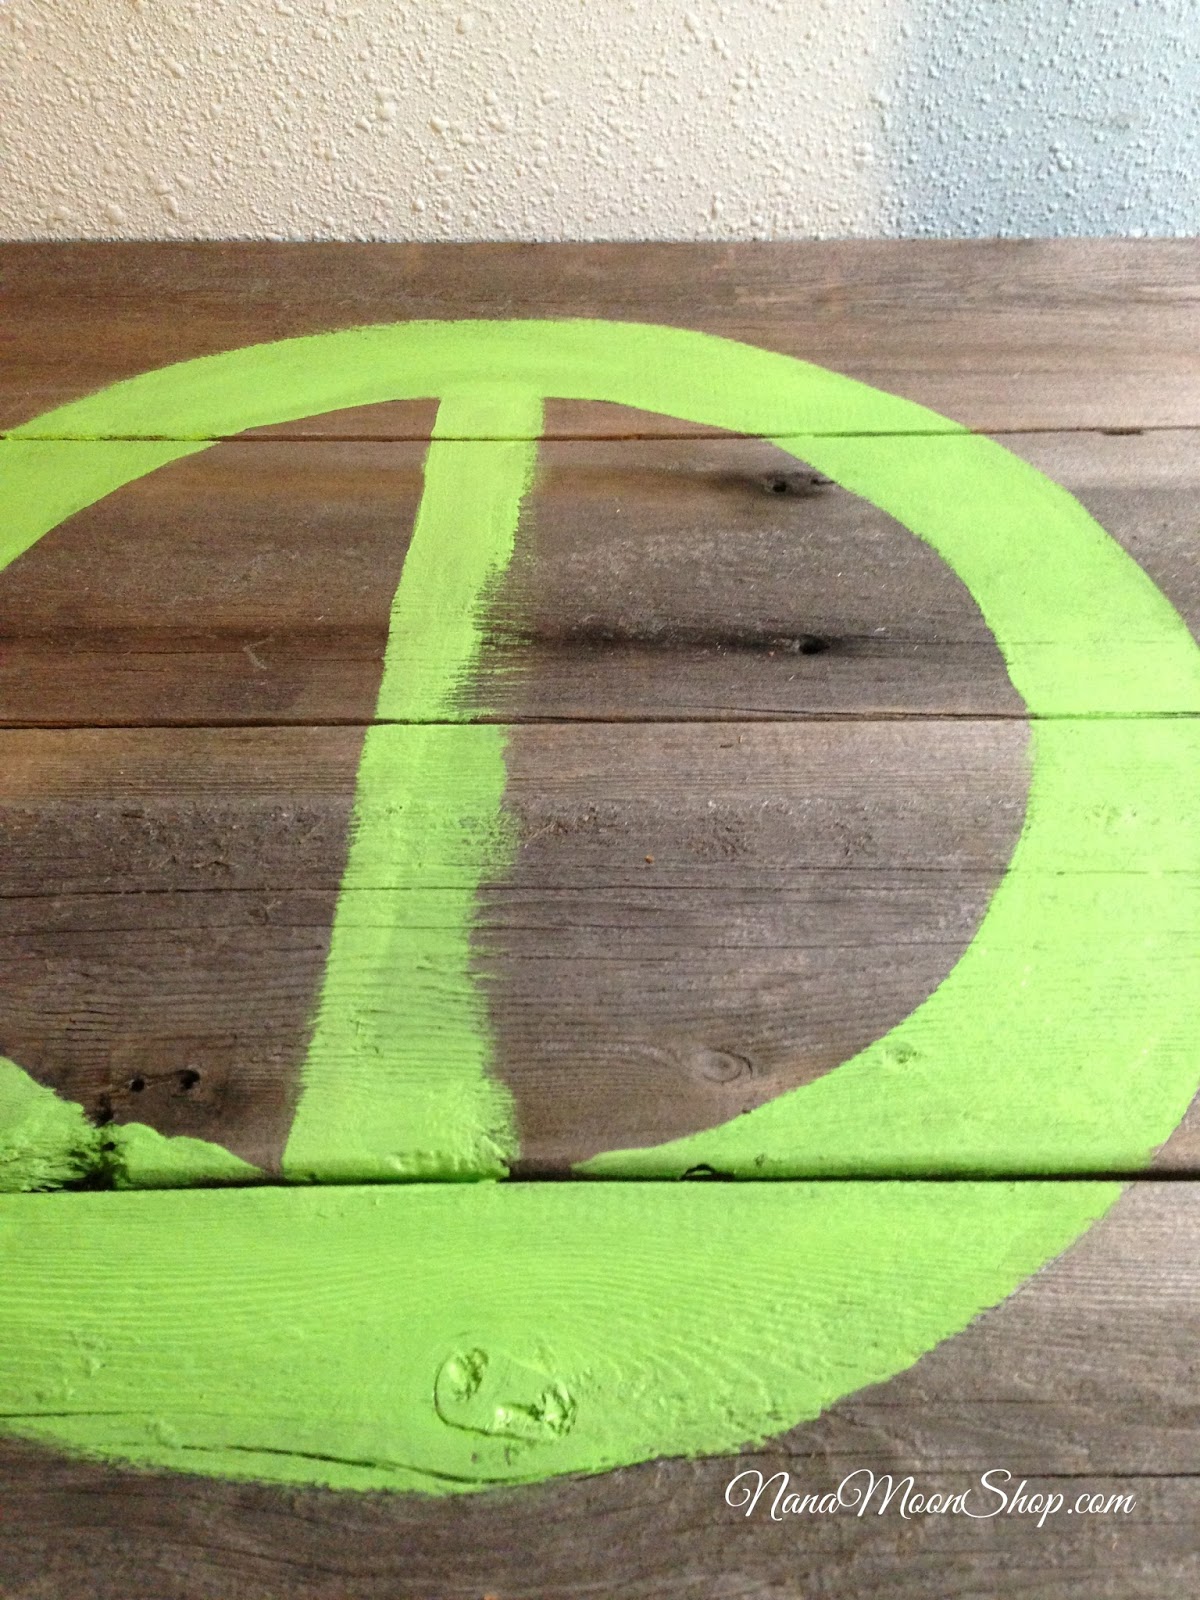
Peace Sign on Reclaimed Wood Painting Tutorial


Peace Sign Painted on Reclaimed Wood


I started with a canvas of reclaimed wood. It was actually fence boards that I had Joe cut down to 24 inches. I used the same technique as we did for the British Flag to attach the 4 boards to each other. These boards did not require stain, they were all ready this weathered gray. I love painting on old cedar boards because they are really light weight and easy to hang.


I started by drawing a circle on the boards in pencil. I traced around a large bowl to achieve this. Then traced around a smaller bowl to create the inner circle. This gave me a rough idea of the lines, I don't really stay in the lines though, just come close.


I picked the brightest green acrylic craft paint I had for this painting because it is for my neon & peace sign loving daughter, Samantha. I used a large M. Grumbacher 10 bristle brush to paint most of it. It is one of my favorite brushes.  With the rough wood grain, it took some water and brushing in every direction to get full paint coverage.


Using an angle brush, I painted a kind of straight line down the center of the circle and filled it in with paint using the bristle brush to do the filling and the angle brush to make the lines straight. (Not perfectly straight by any means. It's art after all.)


I used my bristle brush for a guide as to where to put the remaining lines of the peace sign and painted the line using my angle brush. If you want to use tape here, that would be a good way to go about it. I just like to freehand things.


This is the finished painting. But it was way too fresh to go with the wood, so I decided it needed a little roughing up.


 So I took it outside and hit it lightly with my palm sander. I used a fine sand paper 100 grit. I didn't want to remove the patina of the wood or too much paint.


 Here is the final project. I will take one of it on her wall and update this post. This angle shows my sanding and some of the imperfections that make it personal. I think she will love it. What do you think?


Just a little note on my grandson Cylas. His eye surgery last month went really well and we are hoping that his glasses will be a thing of the past. We will find out in September. The surgery was to correct some muscle weakness behind his eye that let his eyes go crossed. It has made a huge difference so far. If he still needs glasses for his vision, that's OK too, cause they really are cute on him. Thank you for all the well wishes for his recovery!


Happy Painting!


Linking Up With:

Monday, July 15, 2013

Altered Tea Towels

Remember a while back when I stenciled a red anchor on to a set of tea towels for my One Room Challenge Room? It was one of the quickest and rewarding craft projects I've done in a long time.


They are still my favorite towels and have washed up nicely over the year, with the paint and stencil still as vibrant today as when I made them.


Today I made tea towels for my kitchen using an image from The Graphics Fairy and an Avery Light Fabric Transfer. Karen at the Graphics Fairy has done all the work on these images by reversing them for you. All you have to do is hit PRINT.  Print it directly on to the transfer paper.


I found both the Fabric Transfers and the cotton tea towels at Walmart so the supplies for this project are very inexpensive.

Here's how I transferred the image on to the tea towel:

Select image and print directly on to the Transfer Paper and trim if desired. I didn't trim mine because I like the rectangle it creates. Circular or small images should be trimmed so that you have less of the transfer paper left on the towel. Pre-wash your tea towels, then iron them. Turn iron to Cotton Setting with NO Steam. (Be sure to read the directions that come with your transfer paper.)


You have to press really firmly and consistently for about 3 minutes to make the transfer happen. Making sure to get the edges really well, as they tend to peal up over time.


After pressing, I hung it over the back of a chair to cool for about 5 minutes while I ironed the second one. 


Once cooled, you can carefully peal off the backing to reveal your design.

 This was an under 30 minute project. I have a few more ideas for altering tea towels that
 I will be sharing next week.

I took a little time off last week to celebrate my Grandson, Cylas' First Birthday.


My daughters and I had lots of fun making the decorations and baking cupcakes and his little Monster cake for the party, in which we hosted 55 people.  I'll be sharing our Little Monster themed decorations and cupcakes soon.


I will be gone the rest of the week because my our little guy here is getting surgery to correct his strabismus in both of his eyes on Wednesday. To be honest, I am more than a little worried about him. If you are a believer in prayer, could you say one for Cylas? I'll keep everyone up to date on Cy via Instagram, Facebook and Twitter.

Thanks my friends! Have a GREAT week!